A common need in any business is the exchange of data through various file formats. EDI (Electronic Data Interchange) is typically defined in a document that outlines the positions, symbols, and range of acceptable values for a given file standard (834, 872, etc.).


Example of an 834 EDI formatted file
In this exercise, we are going to very quickly turn a SQL dataset result into an XML file and apply an XSL transformation to it- all through SSIS. Using the techniques described below you will be able to create a process to transform data and write data files for any EDI standard with relative ease.
One can add .NET and other customizable code via SSIS "Execute Process" and "Script Task", however in this exercise we are going to stick to the core problem of fetching data from a SQL Server, transforming that data and then writing the result to an output/destination file.

To start, create an Integration Services project in Visual Studio 2017 (install SQL Server Data Tools if your machine does not have the Integration Services Visual Studio project template).
Our project will consist of a Data Flow Task to gather our data (SQL Server to a text file containing the results as XML), and an XML Task which will apply an XSL transformation (XSLT) and write the file to disk.


In my example here, we are using ADO.NET to connect to SQL Server for source data as XML and then writing that data to result.txt.

Next, the SSIS XML Task takes result.txt and applies an XSL stylesheet transformation to it, thereby changing the data from XML to HTML with dynamically added CustomerID values (the integer after the static text, "***CUST**ID**").
The key to the particular (CustomerID) transformation we are doing here is the following code which selects each <Customer> in the XML and writes the <CustomerID> value after "CUST**ID**".
<xsl:for-each select="Root/Customer">
<tr>
<td>NM1*IL*1***CUST**ID**<xsl:value-of select="CustomerID"/>****MI*YYX123456789!</td>
</tr>
</xsl:for-each>

XSLT is the operation, result.txt is our source data, finally.htm our destination and the XSL is Direct Input shown in the highlighted text above.
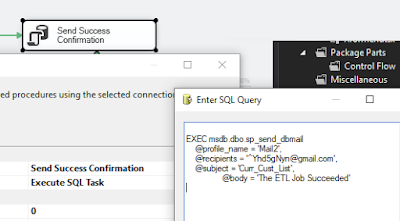
You can easily send mail on success or failure to keep the appropriate personnel informed of ETL job/service status. You can use a connected SMTP server to send mail via the SSIS Send Mail Task or (as I have in this example) you can use this T-SQL for sending mail as an Execute SQL Task:
If you need to create a SQL Server Database Mail account/profile for Gmail, etc, follow this walkthrough.
And with a little luck and no missed steps, you will execute the SSIS package successfully and can go on to really leverage the powerful capabilities of SSIS to build simple and effective solutions for data interchange.

One can add .NET and other customizable code via SSIS "Execute Process" and "Script Task", however in this exercise we are going to stick to the core problem of fetching data from a SQL Server, transforming that data and then writing the result to an output/destination file.

The SSIS package design
To start, create an Integration Services project in Visual Studio 2017 (install SQL Server Data Tools if your machine does not have the Integration Services Visual Studio project template).
Our project will consist of a Data Flow Task to gather our data (SQL Server to a text file containing the results as XML), and an XML Task which will apply an XSL transformation (XSLT) and write the file to disk.

Data Flow Step #1 - Source

Data Flow Step #1 - Destination
In my example here, we are using ADO.NET to connect to SQL Server for source data as XML and then writing that data to result.txt.

result.txt (formatted to more clearly see the Customer XML elements
Next, the SSIS XML Task takes result.txt and applies an XSL stylesheet transformation to it, thereby changing the data from XML to HTML with dynamically added CustomerID values (the integer after the static text, "***CUST**ID**").
The key to the particular (CustomerID) transformation we are doing here is the following code which selects each <Customer> in the XML and writes the <CustomerID> value after "CUST**ID**".
<xsl:for-each select="Root/Customer">
<tr>
<td>NM1*IL*1***CUST**ID**<xsl:value-of select="CustomerID"/>****MI*YYX123456789!</td>
</tr>
</xsl:for-each>

XML Task
XSLT is the operation, result.txt is our source data, finally.htm our destination and the XSL is Direct Input shown in the highlighted text above.
You can easily send mail on success or failure to keep the appropriate personnel informed of ETL job/service status. You can use a connected SMTP server to send mail via the SSIS Send Mail Task or (as I have in this example) you can use this T-SQL for sending mail as an Execute SQL Task:

T-SQL for sending email in Execute SQL Task
And with a little luck and no missed steps, you will execute the SSIS package successfully and can go on to really leverage the powerful capabilities of SSIS to build simple and effective solutions for data interchange.

The completed SSIS package and the .htm result of our ETL exercise


